Welcome to our webinar digest!
In this blog, Michael Van Meurer (Solution Engineer at Kili Technology) and I (Edouard d’Archimbaud, CTO and co-founder of Kili Technology) have packed the highlights of our webinar about GPT and, to further extend, Large Language Models (LLMs) and how it can help with your data labeling productivity.
For the record, at the moment we write this, GPT appeared in our lives a few months ago and got more than 100 million users within its first two months. It's amazing how quickly and easily such a technology has been adopted now (probably because there is no learning curve). AI and GPT are super easy and intuitive to use. It's still difficult to measure the impact that this new generation of models will have, so we are all exploring the possibilities together.
At Kili, we believe that GPT can add to our data labeling industry by making it easier and faster to create high-quality datasets. In this webinar, we will try to answer a few questions:
- What is the functioning of GPT and LLMs?
- How can GPT and large language models be used for data labeling?
- What are the limitations, and how to leverage them in a prediction context?
- Whether you are new to data labeling or looking to improve your existing processes, this webinar is for you.
Let’s go!
What is the current functioning of GPT?
GPT is a model that can interact with you. For example, you can ask it to write a small bash script, and it has the power to change the world. Thanks to GPT, you may never have to write a bash script again.
A bit of vocabulary

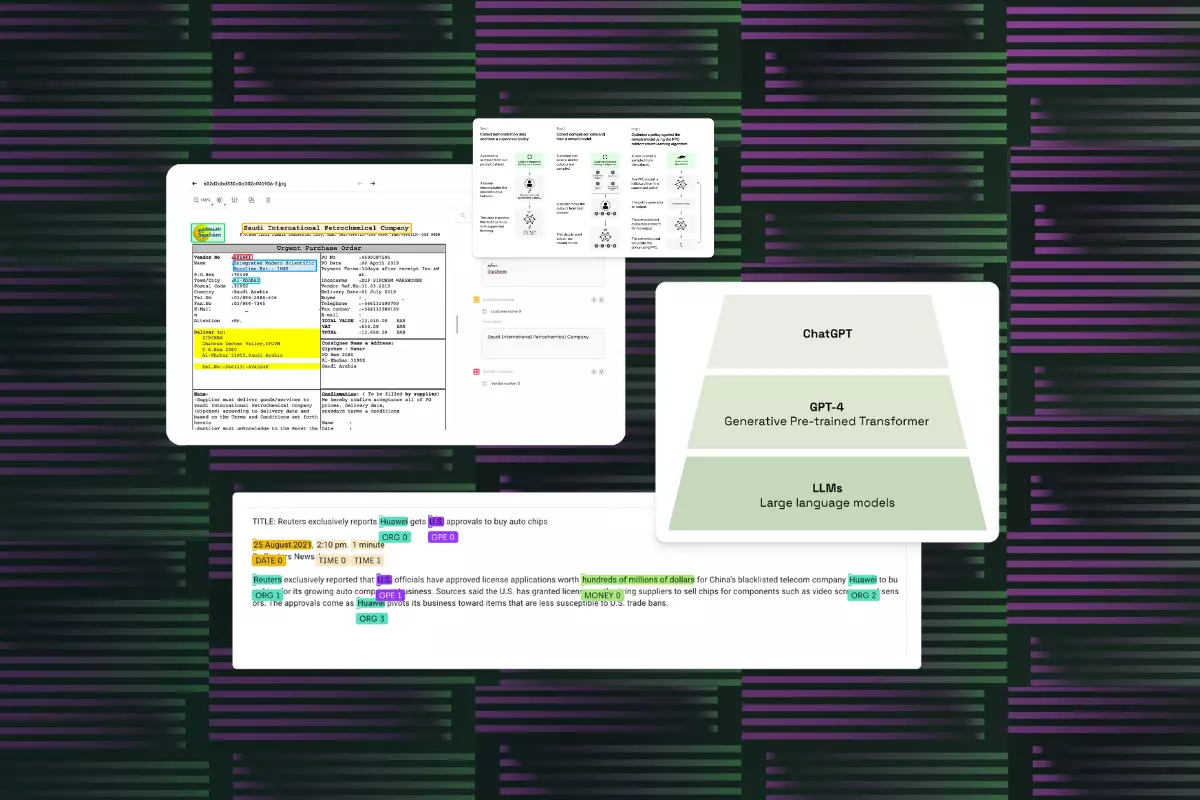
GPT is made up of a large language model, which is pre-trained on text data and can perform a wide range of NLP tasks, such as question answering, text specification, and named entity recognition, without the need for training or fine-tuning. Additionally, GPT (currently GPT-4) stands for Generative Pre-trained Transformer, which is one of the most popular language models developed by OpenAI. Furthermore, GPT is a specific instance of the GPT model, which is itself a large language model that has been fine-tuned on conversational data to generate responses in natural language for use in chatbot applications.

How does Chat GPT work?
GPT is a transformer neural network made with the transformer architecture. It has been trained on a massive dataset of more than 45 terabytes of text data from books, articles, and websites. The model has learned to predict the next most likely word given a context, where the context is defined as the words that come before it.
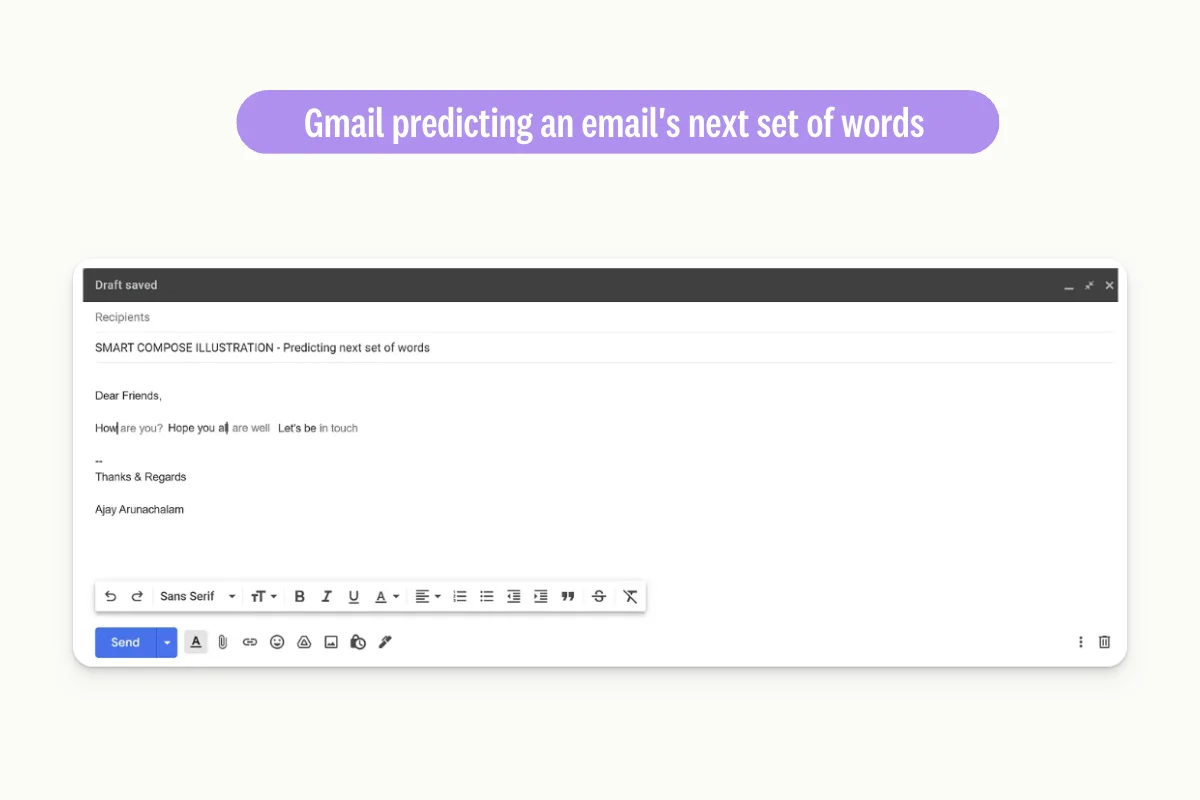
When inferencing, GPT model works similarly to suggestions offered by Gmail.
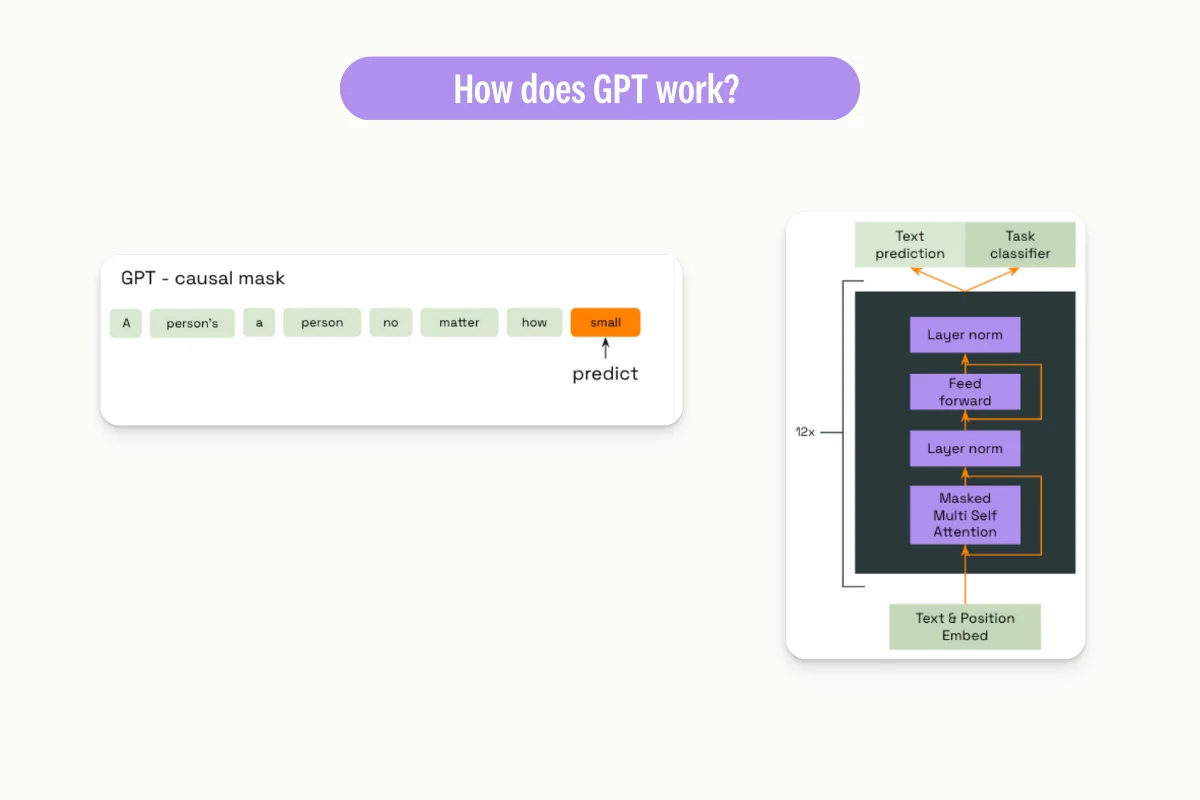
To generate text, GPT processes the user's input prompt one word at a time and predicts the next word based on that input. It continues predicting the next word using the input and the previously predicted word until it has generated the desired amount of text.
How was it build?
Open AI states (cf. their first blogpost): “We trained [Chat GPT from GPT] using Reinforcement Learning from Human feedback”. This is a three-step process.
Step 1: Data labeling transcription task
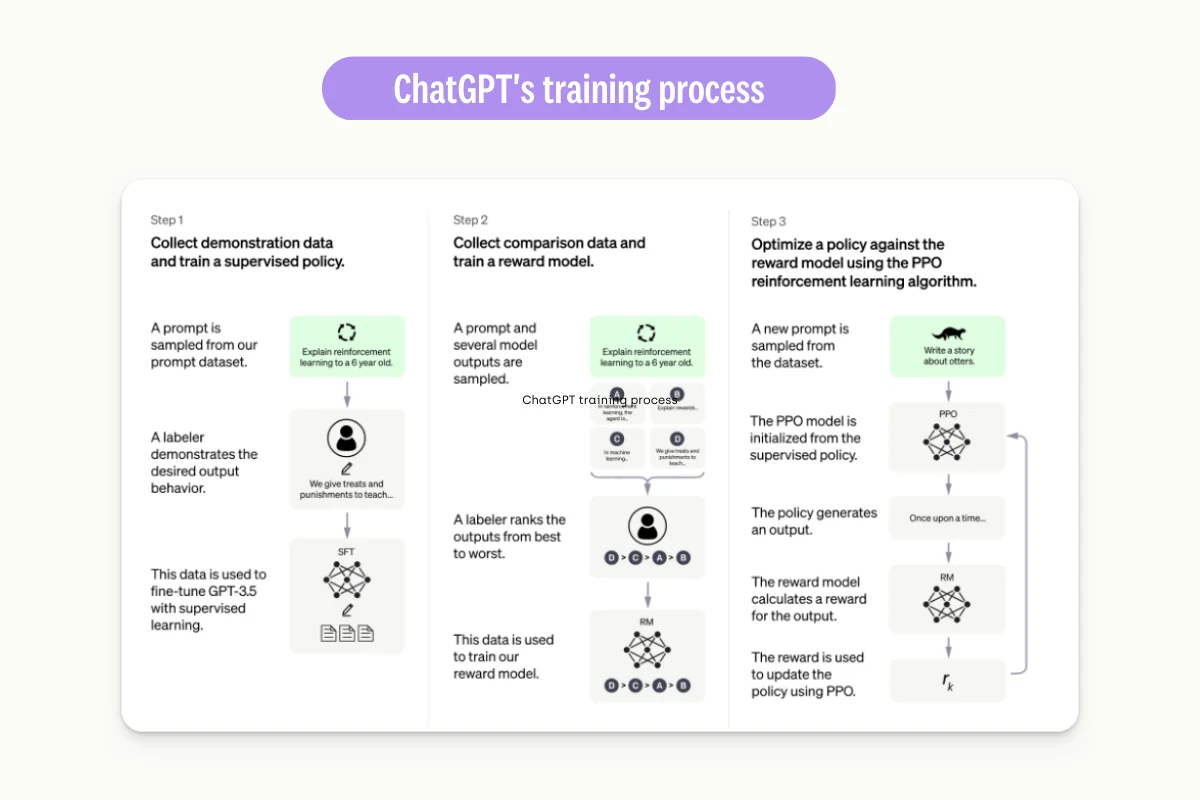
Labelers have had to write plausible Chat GPT answers to users questions. They used this data to train supervised policy
Step 2: Data labeling ranking task
Labelers had to rank candidate answers pre-selected by the supervised policy trained on step 1 from the best to the worst.
Step 3. Data labeling classification task.
Labelers had to classify the quality of generated answer from the previous data labeling tasks.
To turn GPT to chat GPT, it took 3 different data labeling projects.
Chat GPT’s abilities
ChatGPT is a general-purpose model capable of generating complex texts on niche topics such as biology or mathematics, as well as writing code or lyrics. According to OpenAI's demo on GPT-4, it can also turn a website's schema into code.
To get the best out of Chat GPT, you need to ask it the right questions. This is a craft of its own, called prompt engineering, which involves prompting Chat GPT in the most effective way to achieve the desired outcome.
Pro-tips for effective prompting
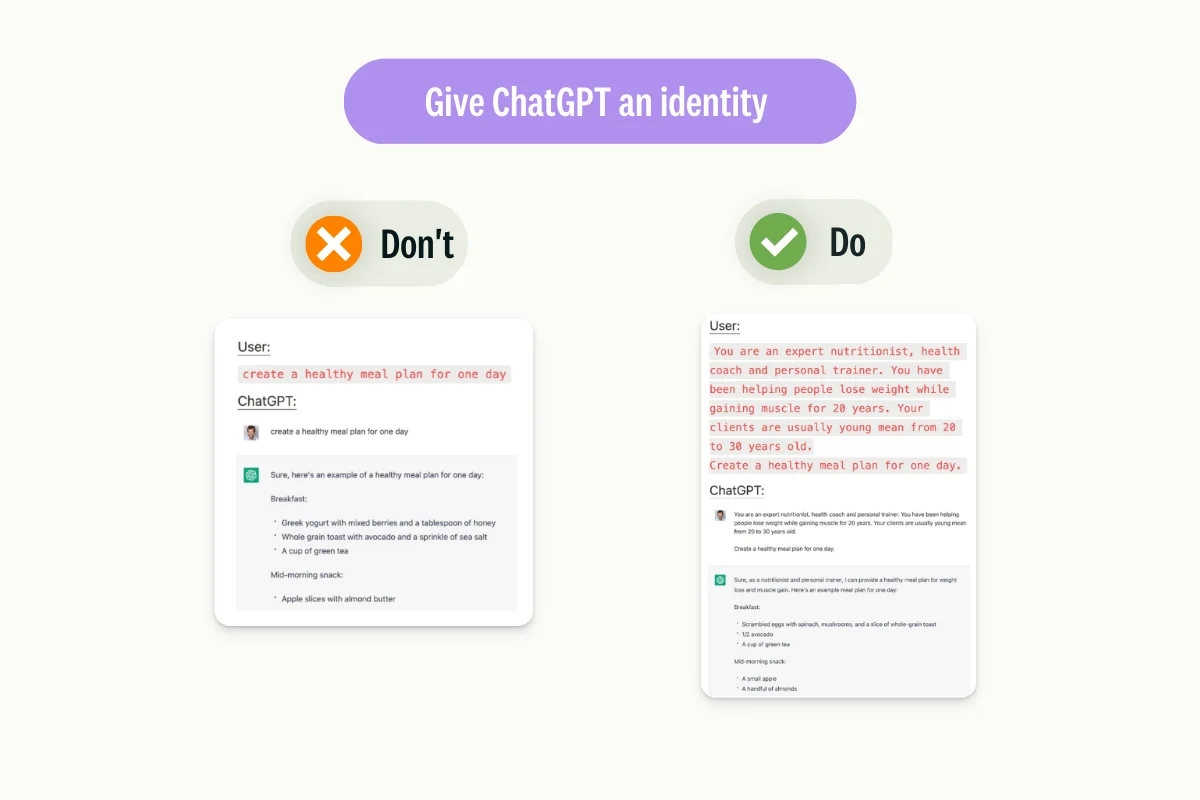
Give Ghat GPT an identity:
Instead of simply requesting a meal plan from the model, provide additional guidance by specifying that the meal plan should be created as if it were from an experienced nutritionist and coach.
Explain your goal:
Embedding your goal into your prompt can help the model understand the tone to adopt, as exemplified below in a Twitter post.
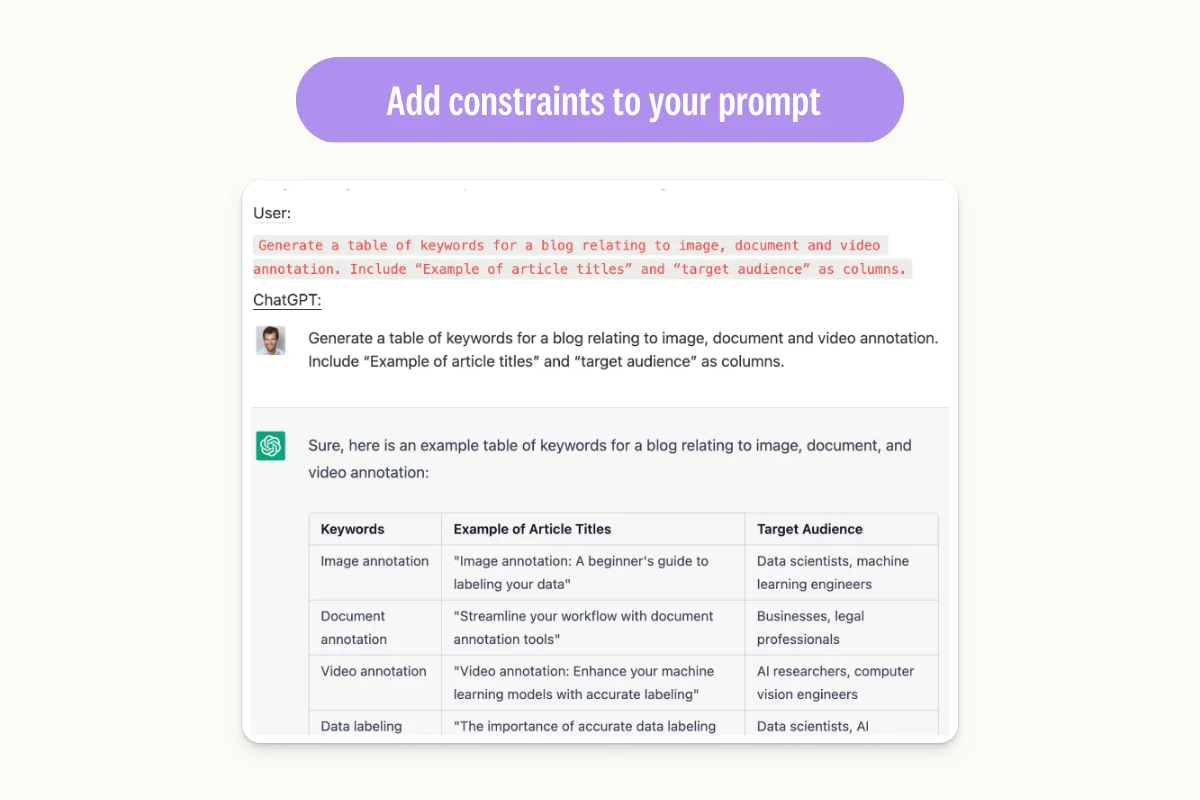
Give constraints to the model:

For better control over ChatGPT's output, you can specify formal requirements when phrasing your prompt. Here are two examples:
- A prompt that requires ChatGPT to follow a table structure.
- A prompt that asks ChatGPT to frame its answer according to a specific sentence.
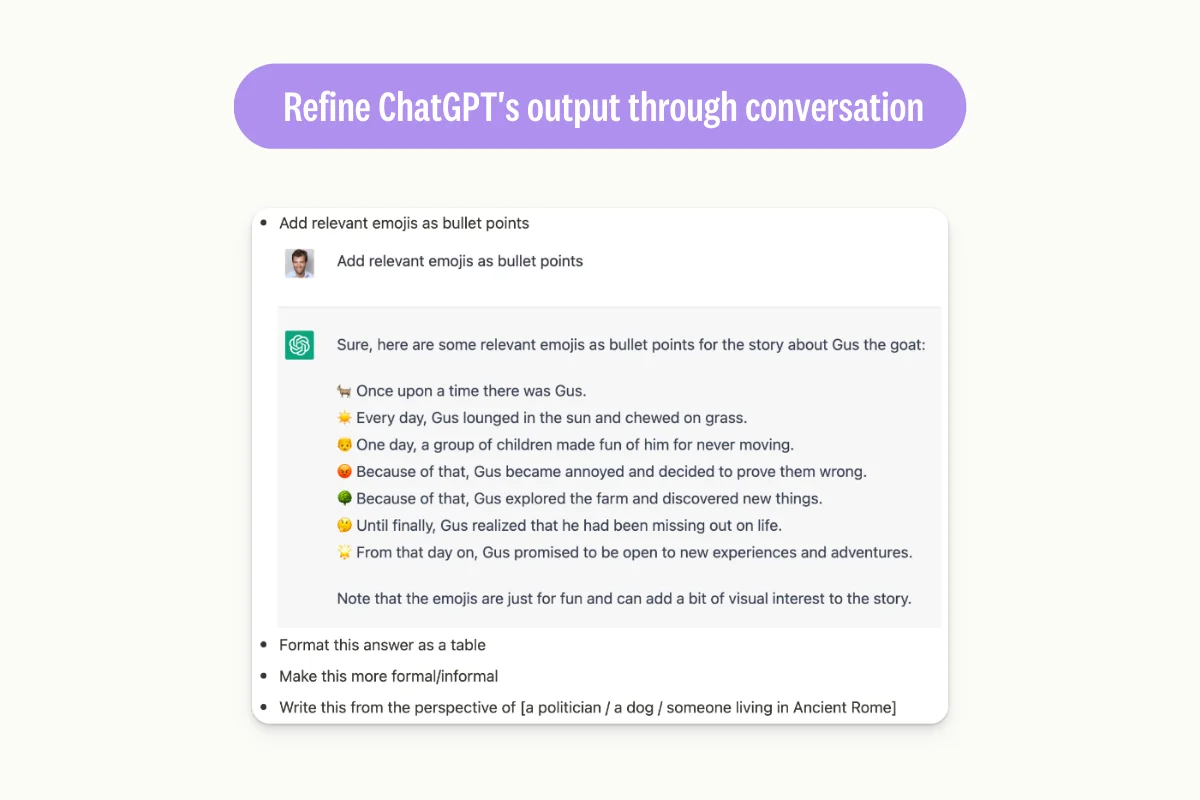
Refine the output through conversation:
When responding to an initial answer, you can continue the conversation with ChatGPT while providing specific guidelines. For example, in the following example, you can add guidelines regarding tone or format requirements.
Learn More
Interested in speeding up your data labeling? Make sure to check out our webinar on how to slash your data labeling time in half using ChatGPT! Access your on-demand session now.

How to leverage LLMs to boost your labeling capabilities
GPT Chat can be used in many ways, notably as a labeler, an asset creator, and a QA Programmer.
GPT as a labeler
This tutorial explains how to use a powerful OpenAI Large Language Model (LLM) to generate pre-annotations that can be imported into a Named Entity Recognition (NER) Kili project.
Nowadays, LLMs are capable of performing many Natural Language Processing (NLP) tasks, including NER, without needing explicit training, which is known as zero-shot learning.
By using a well-designed prompt, we can generate high-quality pre-annotations for the NER task, as demonstrated in the pre-annotation quality evaluation section of this tutorial.
Throughout this tutorial, we will:
- Load a dataset (CoNLL2003) from the HuggingFace datasets library.
- Learn how to use the OpenAI API to generate pre-annotations.
- Import data and labels into a NER project on Kili.
- Evaluate the quality of the generated pre-annotations.
NOTE. You’ll find the detailed process in our notebook.
Importing OpenAI NER pre-annotations
Setup
pip install kili datasets evaluate ipywidgets openai scikit-learn numpy rich

import os
import getpass
import json
import openai
from collections import defaultdict
import numpy as np
from rich.console import Console
from rich.table import Table
Data preparation
In this tutorial, we will use the CoNLL2003 dataset from the Hugging Face repository. This dataset contains more than 10,000 sentences annotated with named entities.
from datasets import load_datasetTo speed up the process, we will use a limited number of samples. We will also remove sentences that do not contain enough words.
MAX_DATAPOINTS = 20
MIN_NB_TOKENS_PER_SENTENCE = 9

dataset = load_dataset("conll2003", split="train").filter(
   lambda datapoint: len(datapoint["tokens"]) >= MIN_NB_TOKENS_PER_SENTENCE
)
dataset = dataset.select(range(MAX_DATAPOINTS))

print(dataset)

`Dataset({
   features: ['id', 'tokens', 'pos_tags', 'chunk_tags', 'ner_tags'],
   num_rows: 20
})`

for i in range(3):
   print(dataset[i])

`{'id': '0', 'tokens': ['EU', 'rejects', 'German', 'call', 'to', 'boycott', 'British', 'lamb', '.'], 'pos_tags': [22, 42, 16, 21, 35, 37, 16, 21, 7], 'chunk_tags': [11, 21, 11, 12, 21, 22, 11, 12, 0], 'ner_tags': [3, 0, 7, 0, 0, 0, 7, 0, 0]}
{'id': '3', 'tokens': ['The', 'European', 'Commission', 'said', 'on', 'Thursday', 'it', 'disagreed', 'with', 'German', 'advice', 'to', 'consumers', 'to', 'shun', 'British', 'lamb', 'until', 'scientists', 'determine', 'whether', 'mad', 'cow', 'disease', 'can', 'be', 'transmitted', 'to', 'sheep', '.'], 'pos_tags': [12, 22, 22, 38, 15, 22, 28, 38, 15, 16, 21, 35, 24, 35, 37, 16, 21, 15, 24, 41, 15, 16, 21, 21, 20, 37, 40, 35, 21, 7], 'chunk_tags': [11, 12, 12, 21, 13, 11, 11, 21, 13, 11, 12, 13, 11, 21, 22, 11, 12, 17, 11, 21, 17, 11, 12, 12, 21, 22, 22, 13, 11, 0], 'ner_tags': [0, 3, 4, 0, 0, 0, 0, 0, 0, 7, 0, 0, 0, 0, 0, 7, 0, 0, 0, 0, 0, 0, 0, 0, 0, 0, 0, 0, 0, 0]}
{'id': '4', 'tokens': ['Germany', "'s", 'representative', 'to', 'the', 'European', 'Union', "'s", 'veterinary', 'committee', 'Werner', 'Zwingmann', 'said', 'on', 'Wednesday', 'consumers', 'should', 'buy', 'sheepmeat', 'from', 'countries', 'other', 'than', 'Britain', 'until', 'the', 'scientific', 'advice', 'was', 'clearer', '.'], 'pos_tags': [22, 27, 21, 35, 12, 22, 22, 27, 16, 21, 22, 22, 38, 15, 22, 24, 20, 37, 21, 15, 24, 16, 15, 22, 15, 12, 16, 21, 38, 17, 7], 'chunk_tags': [11, 11, 12, 13, 11, 12, 12, 11, 12, 12, 12, 12, 21, 13, 11, 12, 21, 22, 11, 13, 11, 1, 13, 11, 17, 11, 12, 12, 21, 1, 0], 'ner_tags': [5, 0, 0, 0, 0, 3, 4, 0, 0, 0, 1, 2, 0, 0, 0, 0, 0, 0, 0, 0, 0, 0, 0, 5, 0, 0, 0, 0, 0, 0, 0]}`
Here is the meaning of each feature in the dataset:
- id: A unique identifier for each token in a sentence.
- tokens: The tokens (words or punctuation marks) in a sentence.
- pos_tags: Part-of-speech tags for each token in the sentence. Part-of-speech tagging is the process of assigning a tag to each word in a sentence that indicates its part of speech (e.g., noun, verb, adjective, etc.).
- chunk_tags: Chunking tags for each token in the sentence. Chunking is the process of grouping words into meaningful phrases based on their syntactic structure.
- ner_tags: Named Entity Recognition (NER) tags for each token in the sentence. NER is the task of identifying named entities in text and classifying them into pre-defined categories such as person, organization, location, etc.
The sentences are split into tokens. We can regroup the tokens for later use:
fix_joined_tokens_map = {" .": ".", "( ": "(", " )": ")", " 's ": "'s ", "s ' ": "s' "}

sentence_column = []
for datapoint in dataset:
   sentence = " ".join(datapoint["tokens"])
   for before, after in fix_joined_tokens_map.items():
       sentence = sentence.replace(before, after)
   sentence_column.append(sentence)

dataset = dataset.add_column("sentence", sentence_column)

print(dataset[0])
{'id': '0', 'tokens': ['EU', 'rejects', 'German', 'call', 'to', 'boycott', 'British', 'lamb', '.'], 'pos_tags': [22, 42, 16, 21, 35, 37, 16, 21, 7], 'chunk_tags': [11, 21, 11, 12, 21, 22, 11, 12, 0], 'ner_tags': [3, 0, 7, 0, 0, 0, 7, 0, 0], 'sentence': 'EU rejects German call to boycott British lamb.'}

NER_TAGS_ONTOLOGY = {
   "O": 0,
   "B-PERSON": 1,
   "I-PERSON": 2,
   "B-ORGANIZATION": 3,
   "I-ORGANIZATION": 4,
   "B-LOCATION": 5,
   "I-LOCATION": 6,
   "B-MISCELLANEOUS": 7,
   "I-MISCELLANEOUS": 8,
}
NER_TAGS_ONTOLOGY is a dictionary that maps the named entity tags in the CoNLL2003 dataset to integer labels. Here is the meaning of each key-value pair in the dictionary:
- O: Represents the tag "O" which means that the token is not part of a named entity.
- B-PERSON: Represents the beginning of a person.
- I-PERSON: Represents a token inside a person.
- B-ORGANIZATION: Represents the beginning of an organization.
- I-ORGANIZATION: Represents a token inside an organization.
- B-LOCATION: Represents the beginning of a location.
- I-LOCATION: Represents a token inside a location.
- B-MISCELLANEOUS: Represents the beginning of a miscellaneous.
- I-MISCELLANEOUS: Represents a token inside a miscellaneous.
During the training of a NER model, the entity names will be converted to integer labels using such a dictionary.
Connect with ChatGPT API
Let's use the OpenAI API to get the pre-annotations for our dataset.
if "OPENAI_API_KEY" in os.environ:
   OPENAI_API_KEY = os.environ["OPENAI_API_KEY"]
else:
   OPENAI_API_KEY = getpass.getpass("Please enter your OpenAI API key: ")

openai.api_key = OPENAI_API_KEY
We can now define the parameters that will be used during the query to OpenAI model:
- model: the model that will be used to generate the pre-annotations. The full list is available under this link.
- temperature: the temperature of the model. The higher the temperature, the more random the text. The lower the temperature, the more likely it is to predict the next word. The default value is 0.7. It should be between 0 and 2. Higher values like 0.8 will make the output more random, while lower values like 0.2 will make it more focused and deterministic.
- max_tokens: the maximum number of tokens to generate. The default value is 64. It should be between 1 and 4096, depending on the model.
print(ask_openai("Hello, are you here?"))

Yes, I am here. How can I help you?
Prompt design
To get pre-annotations for our dataset, we need to create a prompt that tells the model what to do:
base_prompt = """In the sentence below, give me the list of:
- organization named entity
- location named entity
- person named entity
- miscellaneous named entity.
Format the output in json with the following keys:
- ORGANIZATION for organization named entity
- LOCATION for location named entity
- PERSON for person named entity
- MISCELLANEOUS for miscellaneous named entity.
Sentence below:
"""
Let's see if the model understands the prompt well on a simple example:
test_sentence = (
   "Elon Musk is the CEO of Tesla and SpaceX. He was born in South Africa and now lives in the"
   " USA. He is one of the founders of OpenAI."
)

print(ask_openai(base_prompt + test_sentence))

`{
 "ORGANIZATION": ["Tesla", "SpaceX", "OpenAI"],
 "LOCATION": ["South Africa", "USA"],
 "PERSON": ["Elon Musk"],
 "MISCELLANEOUS": []
}`
Looks really good! Let's now process all sentences in our dataset with the previous prompt.
Create the pre-annotations
In the code below, we will use the OpenAI API to get the pre-annotations for each sentence in our dataset.
openai_answers = []
for datapoint in dataset:
   sentence = datapoint["sentence"]
   answer = ask_openai(base_prompt + sentence)
   try:
       answer_json = json.loads(answer)
   except json.JSONDecodeError:
       print(f"Wrong json formatting:\n{answer}")
       answer_json = {"ORGANIZATION": [], "LOCATION": [], "PERSON": [], "MISCELLANEOUS": []}
   openai_answers.append(answer_json)

print(openai_answers[:3])
[{'ORGANIZATION': ['EU', 'German'], 'LOCATION': ['British'], 'PERSON': [], 'MISCELLANEOUS': ['lamb']}, {'ORGANIZATION': ['European Commission'], 'LOCATION': ['German', 'British'], 'PERSON': [], 'MISCELLANEOUS': ['mad cow disease']}, {'ORGANIZATION': ["European Union's veterinary committee"], 'LOCATION': ['Germany', 'Britain'], 'PERSON': ['Werner Zwingmann'], 'MISCELLANEOUS': []}]
We need to sanitize the json to make sure that the values are of type list:
for i, _ in enumerate(openai_answers):
   json_dict = openai_answers[i]
   for category in json_dict:
       if isinstance(json_dict[category], str):
           json_dict[category] = [json_dict[category]]
       elif isinstance(json_dict[category], list):
           continue
       else:
           print(f"Unknown value type '{json_dict[category]}' for value '{json_dict[category]}'")
           json_dict[category] = []
Import dataset and pre-annotations to Kili
Now that we have both the data and the pre-annotations, we can import them to a Kili project.
if "KILI_API_KEY" in os.environ:
   KILI_API_KEY = os.environ["KILI_API_KEY"]

else

   KILI_API_KEY = getpass.getpass("Please enter your Kili API key: ")

from kili.client import Kili

kili = Kili(
   api_key=KILI_API_KEY,  # no need to pass the API_KEY if it is already in your environment variables# api_endpoint="https://cloud.kili-technology.com/api/label/v2/graphql",# the line above can be uncommented and changed if you are working with an on-premise version of Kili
)
Below, we define the ontology (json interface) of the project. We define the 4 classes as well as their corresponding colors:
COLORS = ["#1f77b4", "#ff7f0e", "#2ca02c", "#d62728"]

ENTITY_TYPES = [
   ("PERSON", "Person"),
   ("ORGANIZATION", "Organization"),
   ("LOCATION", "Location"),
   ("MISCELLANEOUS", "Miscellaneous"),
]

ENTITY_TYPES_WITH_COLORS = [
   (entity_type[0], entity_type[1], color) for entity_type, color in zip(ENTITY_TYPES, COLORS)
]
print(ENTITY_TYPES_WITH_COLORS)

`[('PERSON', 'Person', '#1f77b4'), ('ORGANIZATION', 'Organization', '#ff7f0e'), ('LOCATION', 'Location', '#2ca02c'), ('MISCELLANEOUS', 'Miscellaneous', '#d62728')]`

In [ ]:

json_interface = {
   "jobs": {
       "NAMED_ENTITIES_RECOGNITION_JOB": {
           "mlTask": "NAMED_ENTITIES_RECOGNITION",
           "content": {
               "categories": {
                   name: {"name": name_pretty, "children": [], "color": color}
                   for name, name_pretty, color in ENTITY_TYPES_WITH_COLORS
               },
               "input": "radio",
           },
           "instruction": "",
           "required": 1,
           "isChild": False,
       }
   },
}
Let's now create the project with its ontology:
In [ ]:

project = kili.create_project(
   title="CoNLL Named Entity Recognition with OpenAI pre-annotations",
   input_type="TEXT",
   json_interface=json_interface,
)
project_id = project["id"]
We now import the sentences to the project:
external_id_array = []
content_array = []
for datapoint in dataset:
   sentence = datapoint["sentence"]
   content_array.append(sentence)
   external_id_array.append(datapoint["id"])

print(content_array[:3])
print(external_id_array[:3])

['EU rejects German call to boycott British lamb.', 'The European Commission said on Thursday it disagreed with German advice to consumers to shun British lamb until scientists determine whether mad cow disease can be transmitted to sheep.', "Germany's representative to the European Union's veterinary committee Werner Zwingmann said on Wednesday consumers should buy sheepmeat from countries other than Britain until the scientific advice was clearer."] ['0', '3', '4']

kili.append_many_to_dataset(
   project_id=project_id, content_array=content_array, external_id_array=external_id_array
)

Out[ ]:

{'id': 'clf14l26401or0jv4e0d7d9ge'}
If you go to the project page, you should be able to see your assets:
And on the labeling interface, you will see the sentence and the ontology:
We can finally import our OpenAI-generated pre-annotations!
json_response_array = []

for datapoint, sentence_annotations in zip(dataset, openai_answers):
   full_sentence = datapoint["sentence"]
   annotations = []  # list of annotations for the sentencefor category, _ in ENTITY_TYPES:
       sentence_annotations_cat = sentence_annotations[category]
       for content in sentence_annotations_cat:
           begin_offset = full_sentence.find(content)
           assert (
               begin_offset != -1
           ), f"Cannot find offset of '{content}' in sentence '{full_sentence}'"
           annotation = {
               "categories": [{"name": category}],
               "beginOffset": begin_offset,
               "content": content,
           }
           annotations.append(annotation)

   json_resp = {"NAMED_ENTITIES_RECOGNITION_JOB": {"annotations": annotations}}
   json_response_array.append(json_resp)

print(json_response_array[0])

`{'NAMED_ENTITIES_RECOGNITION_JOB': {'annotations': [{'categories': [{'name': 'ORGANIZATION'}], 'beginOffset': 0, 'content': 'EU'}, {'categories': [{'name': 'ORGANIZATION'}], 'beginOffset': 11, 'content': 'German'}, {'categories': [{'name': 'LOCATION'}], 'beginOffset': 34, 'content': 'British'}, {'categories': [{'name': 'MISCELLANEOUS'}], 'beginOffset': 42, 'content': 'lamb'}]}}`
We then import the annotations using the kili.create_predictions() method:
kili.create_predictions(
   project_id,
   external_id_array=external_id_array,
   json_response_array=json_response_array,
   model_name=openai_query_params["model"],
)

Out[ ]:

{'id': 'clf14l26401or0jv4e0d7d9ge'}
In the main project page, you should now be able to see that the assets have been pre-annotated with the model you chose before:
On the labeling interface for a specific asset, you can see the pre-annotations:
Great! We have successfully pre-annotated our dataset. Looks like this solution has the potential to save us a lot of time in future projects.
Pre-annotations quality evaluation
Because OpenAI-generated pre-annotations are not perfect, it would be great to have a way to measure the model's accuracy.
Since our dataset CoNLL2003 has been annotated, we can easily evaluate the quality of the pre-annotations generated by OpenAI.
def format_sentence_annotations(sentence_annotations):
   """
   Maps a token to its NER tag (B-ORGANIZATION, I-ORGANIZATION, etc.) class value.
   """
   ret = defaultdict(list)
   for category, _ in ENTITY_TYPES:
       sentence_annotations_cat = sentence_annotations[category]
       for content in sentence_annotations_cat:
           content_split = content.split(" ")
           for i, token in enumerate(content_split):
               if i == 0:
                   ret[token].append(NER_TAGS_ONTOLOGY[f"B-{category}"])
               else:
                   ret[token].append(NER_TAGS_ONTOLOGY[f"I-{category}"])
   return ret


references = []
predictions = []
for datapoint, sentence_annotations in zip(dataset, openai_answers):
   references.append(datapoint["ner_tags"])

   sentence_annotations = format_sentence_annotations(sentence_annotations)
   ner_tags_predicted = []
   for token in datapoint["tokens"]:
       if token in sentence_annotations and len(sentence_annotations[token]) > 0:
           ner_tags_predicted.append(sentence_annotations[token][0])
           del sentence_annotations[token][0]
       else:
           ner_tags_predicted.append(NER_TAGS_ONTOLOGY["O"])
   predictions.append(ner_tags_predicted)

print(dataset[0]["tokens"])
print(references[0])
print(predictions[0])
print(NER_TAGS_ONTOLOGY)

`['EU', 'rejects', 'German', 'call', 'to', 'boycott', 'British', 'lamb', '.']
[3, 0, 7, 0, 0, 0, 7, 0, 0]
[3, 0, 3, 0, 0, 0, 5, 7, 0]
{'O': 0, 'B-PERSON': 1, 'I-PERSON': 2, 'B-ORGANIZATION': 3, 'I-ORGANIZATION': 4, 'B-LOCATION': 5, 'I-LOCATION': 6, 'B-MISCELLANEOUS': 7, 'I-MISCELLANEOUS': 8}`

def flatten_list(list_):
   ret = []
   for sublist in list_:
       ret.extend(sublist)
   return ret

references = flatten_list(references)
predictions = flatten_list(predictions)
references = np.array(references)
predictions = np.array(predictions)

In [ ]:

from sklearn.metrics import f1_score
We will use the F1 score to report the results.
table = Table(title=f"Results")

table.add_column("Class")
table.add_column("F1")
table.add_column("Nb samples", justify="center")

for class_name, class_value in NER_TAGS_ONTOLOGY.items():
   y_true = np.where(references == class_value, 1, 0)
   y_pred = np.where(predictions == class_value, 1, 0)
   table.add_row(
       class_name,
       f"{f1_score(y_true, y_pred) * 100:6.1f}%",
       f"{y_true.sum():3d}",
       end_section=True,
   )

*# Group tokens regardless of their positions in the entities*
NER_TAGS_ONTOLOGY_GROUPED = {
   "PERSON": (1, 2),
   "ORGANIZATION": (3, 4),
   "LOCATION": (5, 6),
   "MISCELLANEOUS": (7, 8),
}
for class_name, class_values in NER_TAGS_ONTOLOGY_GROUPED.items():
   y_true = np.where((references == class_values[0]) | (references == class_values[1]), 1, 0)
   y_pred = np.where((predictions == class_values[0]) | (predictions == class_values[1]), 1, 0)
   table.add_row(
       class_name,
       f"{f1_score(y_true, y_pred) * 100:6.1f}%",
       f"{y_true.sum():3d}",
       style="bold green",
       end_section=True,
   )

table.add_row(
   "All",
   f"{f1_score(references, predictions, average='weighted') * 100:6.1f}%",
   f"{len(references):3d}",
   style=f"bold bright_red",
)

console = Console()
console.print(table)
Results
Let's now take a look at the results.
Results
ClassF1Nb samples093.4%468B-person 90.9%12I-person100.0%10B-organization58.8%12I-organization44.4%8B-location71.4%14I-location0.0%0B-miscellaneous10.3%15I-miscellaneous31.2%5Person95.2%22Organization53.8%20Location71.4%14Miscellaneous19.7%20All88.6%544
Quite good, right?!
As we can see, the pre-annotations are not perfect, but the LLM seems to be able to generate pre-annotations that are good enough to help us speed up the labeling process in future projects.
GPT-3 Fine-Tuning
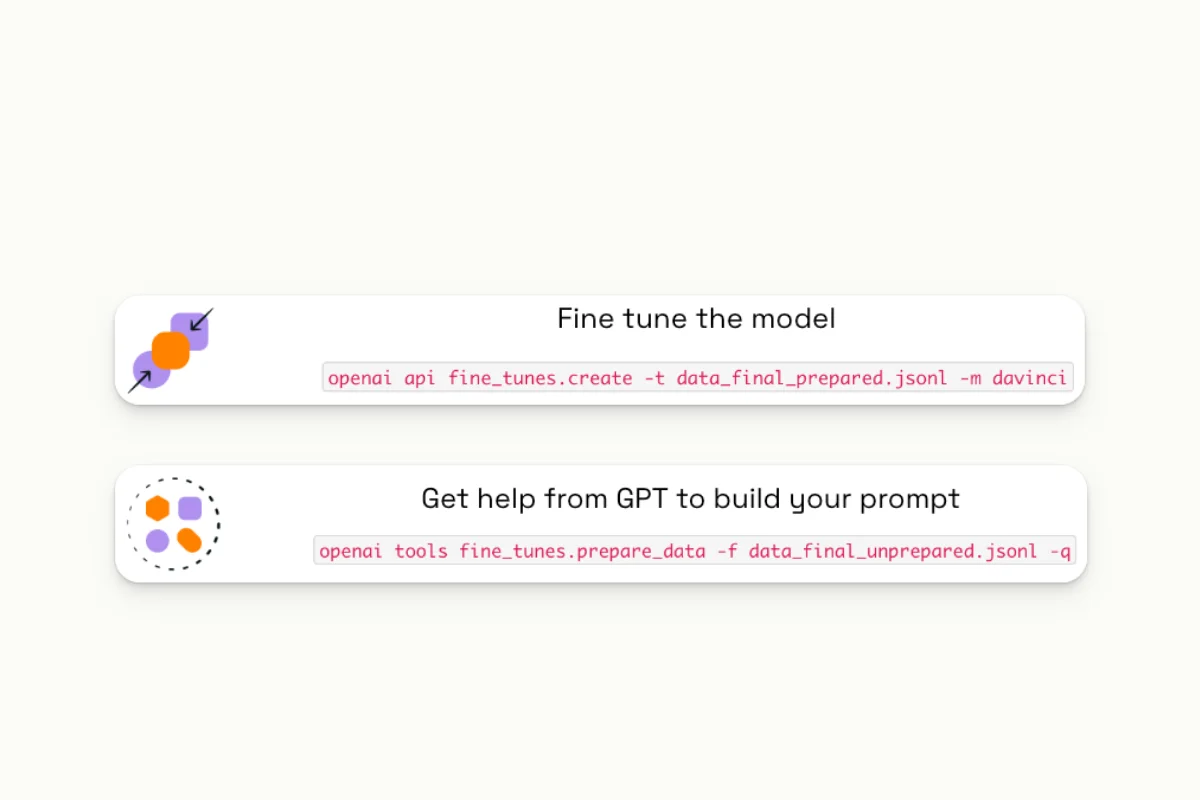
Fine-tuning is a process that allows pre-trained models such as GPT to be customized for specific applications. It enables few-shot learning, which means that instead of iterating several dozen times on models, you can fine-tune them just three or four times to achieve significantly better performance, given the high initial performance of the base model. To fine-tune the model, simply create a fine-tune with a specific command.
GPT can be used for pre-labeling data, conducting QA, creating assets, few-shot labeling, and generating synthetic data.
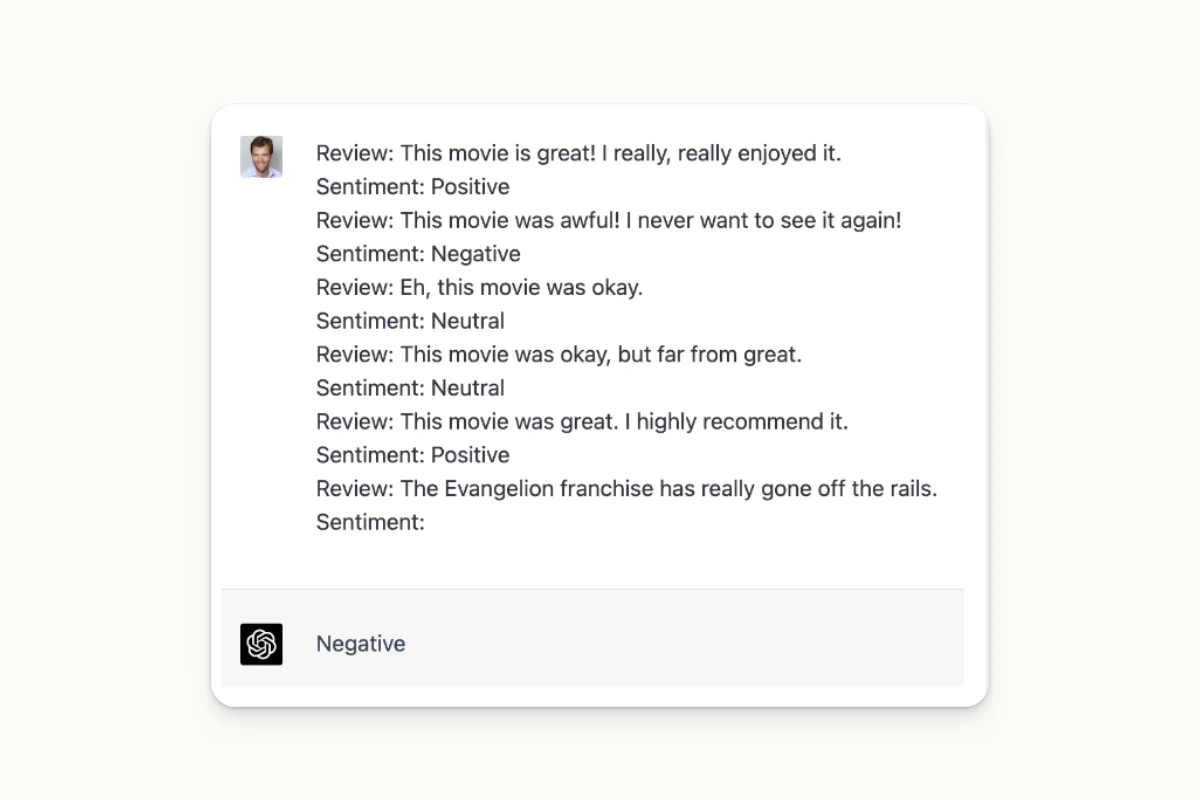
Chat GPT can also be used for Few-Shots labeling.
GPT as a QA programmer
Suppose you're annotating images of people standing. On average, your bounding boxes should be taller than they are wide. You can check this using Chat GPT by asking it to write a plugin for you. This will enable you to automate the writing process.


ChatGPT as an asset creator
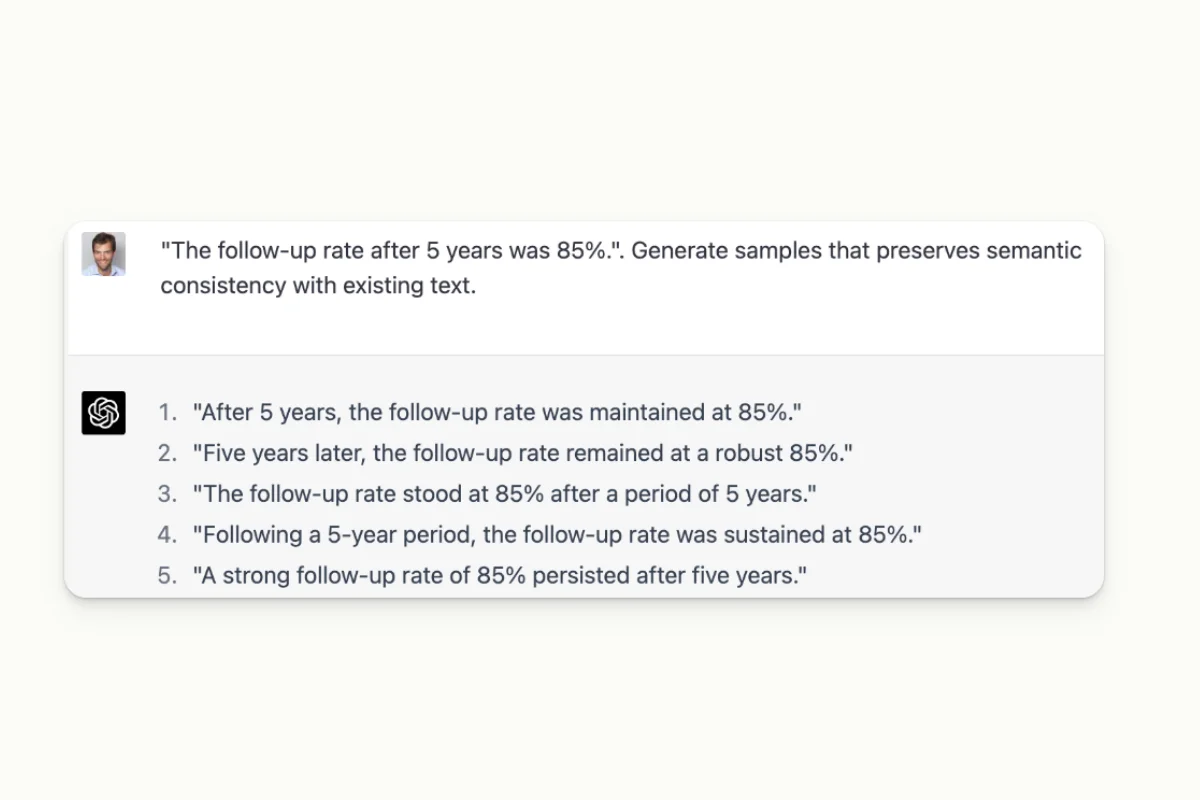
In addition to being a valuable tool for data pre-annotation and QA programming, ChatGPT can also aid in data augmentation.
The model can be asked to generate assets, either in the form of text or images, which is an effective way to increase the amount of available data in a training dataset. It can also be used on its own for generating text.
...Or combined with MidJourney to generate image data. In the latter case, Chat GPT will be utilized to create prompts for MidJourney.
Limitations
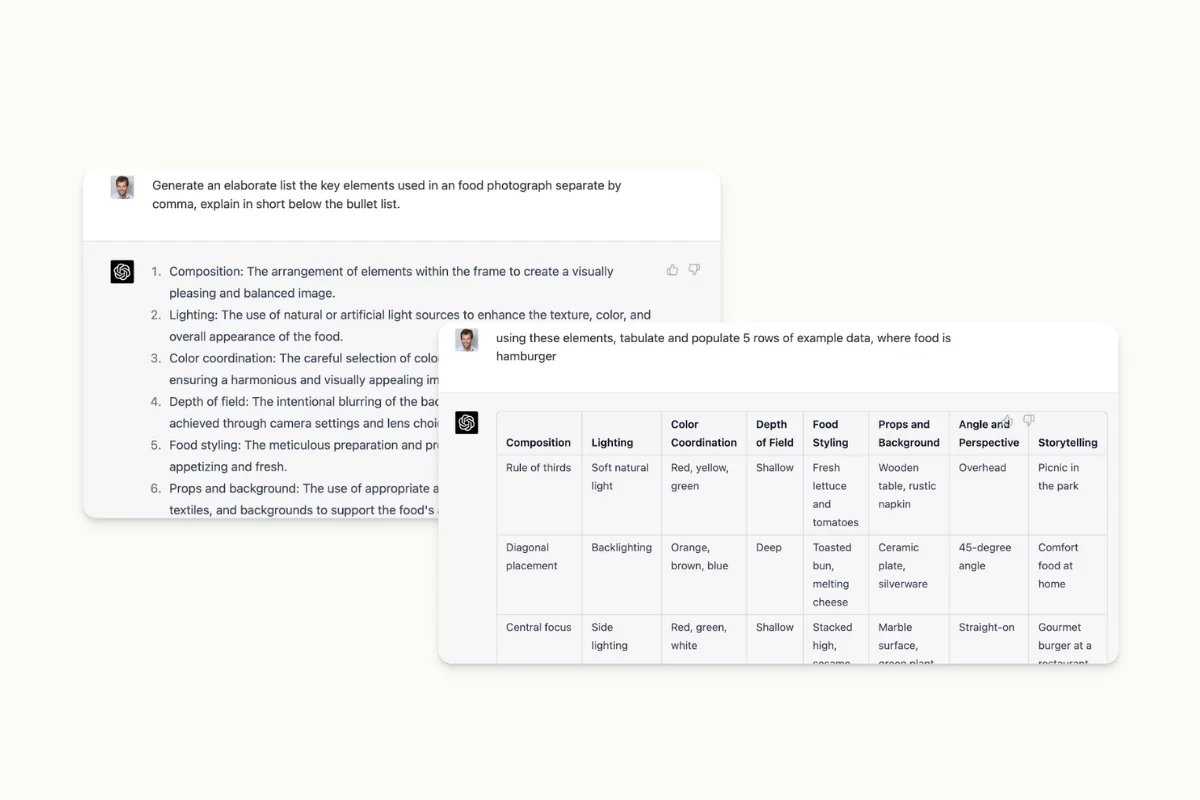


On the bright side, ChatGPT is likely to save us a considerable amount of time due to its various data labeling use cases. However, the model is not without drawbacks.
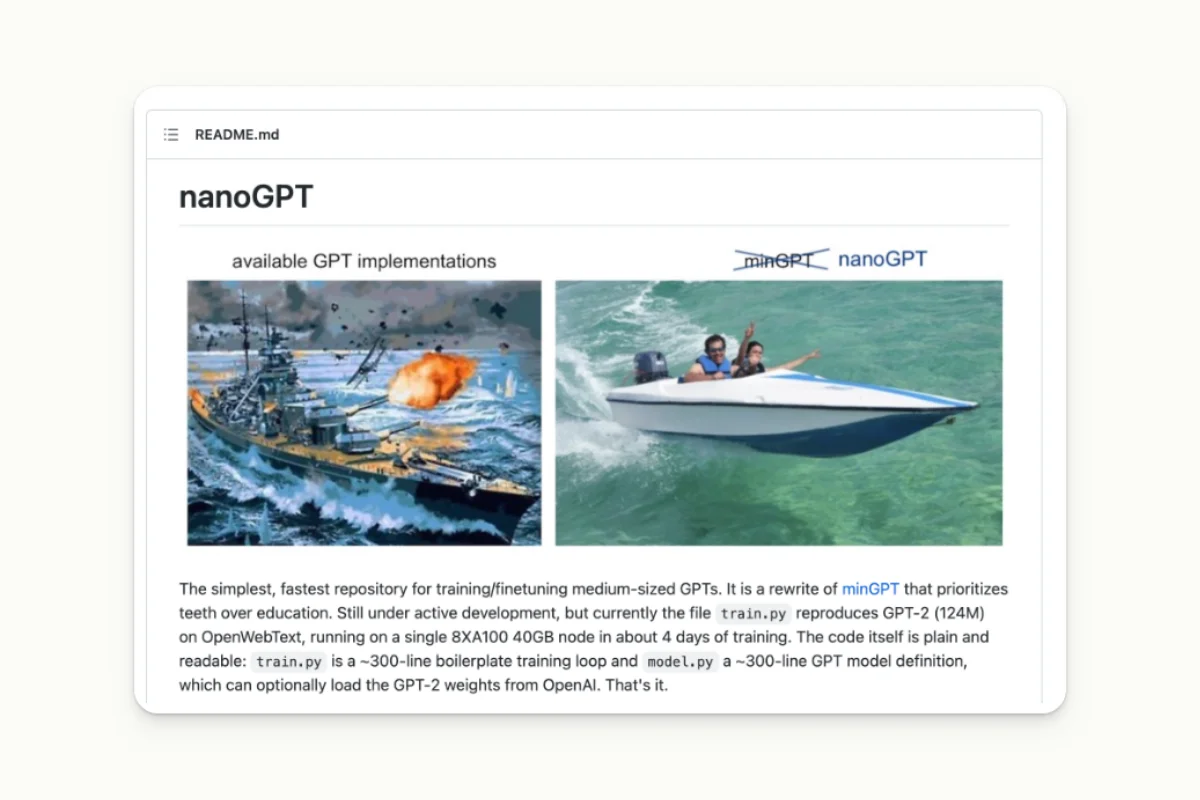
Costs
Perhaps the most notable cost is the training expenses, which, although undisclosed, are estimated to be in the tens of millions of dollars. The daily operating costs are estimated to be around $100,000.
Black Box
Second up: the black box nature of the model, which makes it difficult to understand how it reaches its conclusion and how it generates its answers.
In the example above, Chat GPT correctly identified the entities extracted but was wrong on the offset. It is difficult to say why this happened.

This lack of transparency creates a risk, especially for sensitive industries such as healthcare or finance.
Slowness of usage
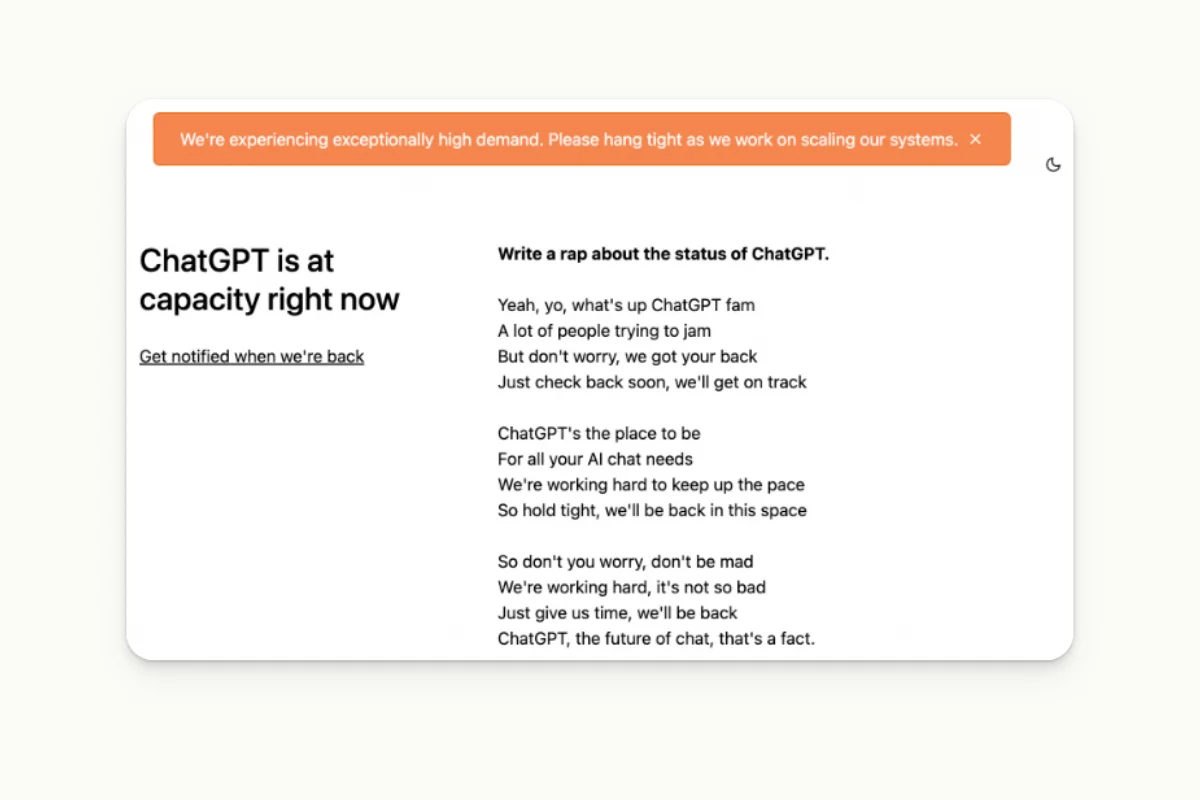
Overall, the model is still pretty slow. GPT4 API is capped at 25 interactions every 3 hours. It’s a significant drawback in the production context when speed is capital.
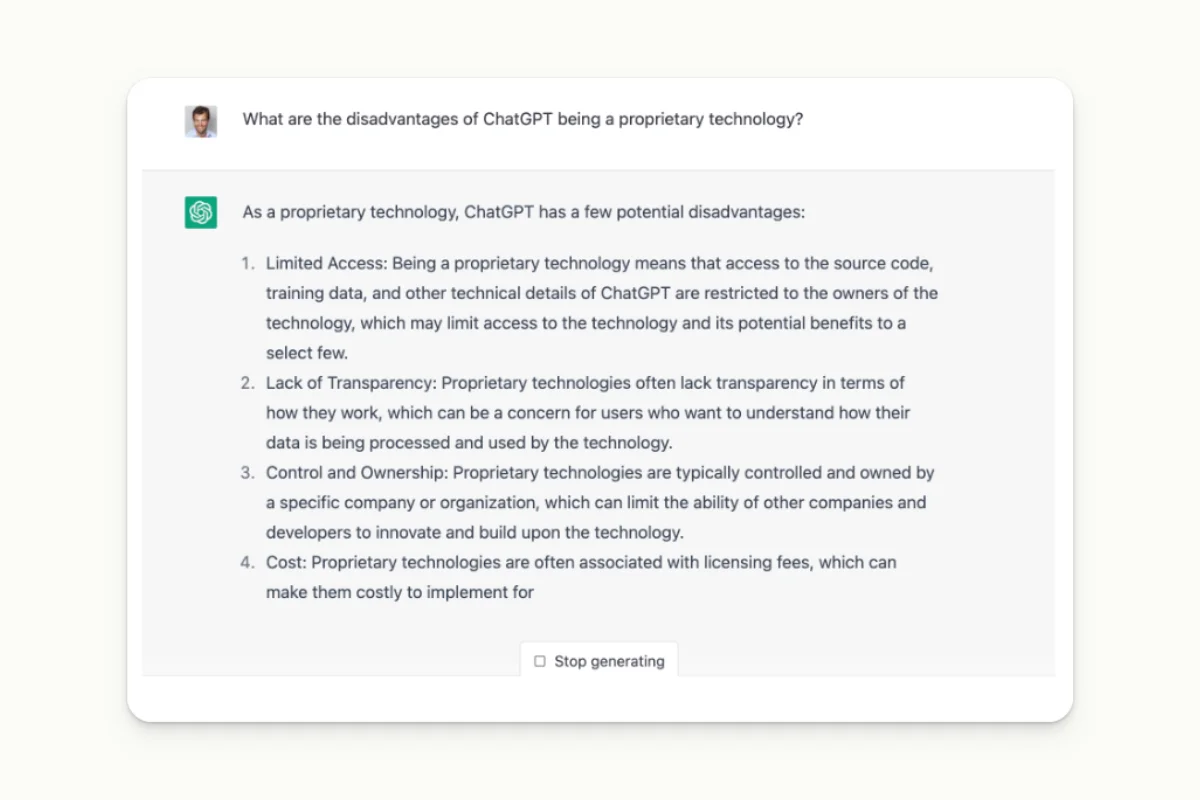
Proprietary Technology
According to ChatGPT itself, it has some limitations.
Data Privacy
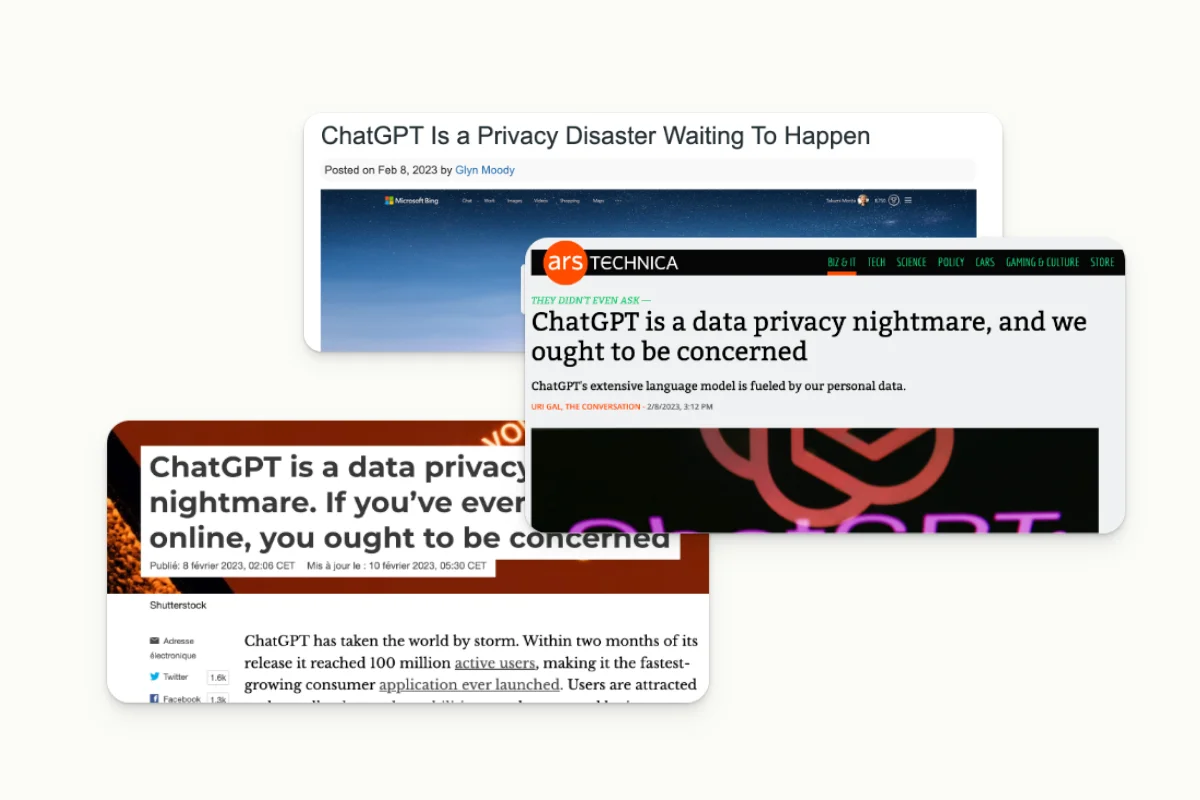
One of the prominent drawbacks of ChatGPT is its impact on privacy and legal issues. This is primarily because it has been trained on billions of scraped data, which creates tedious issues regarding intellectual property and may sometimes include personal information.
What's Next?
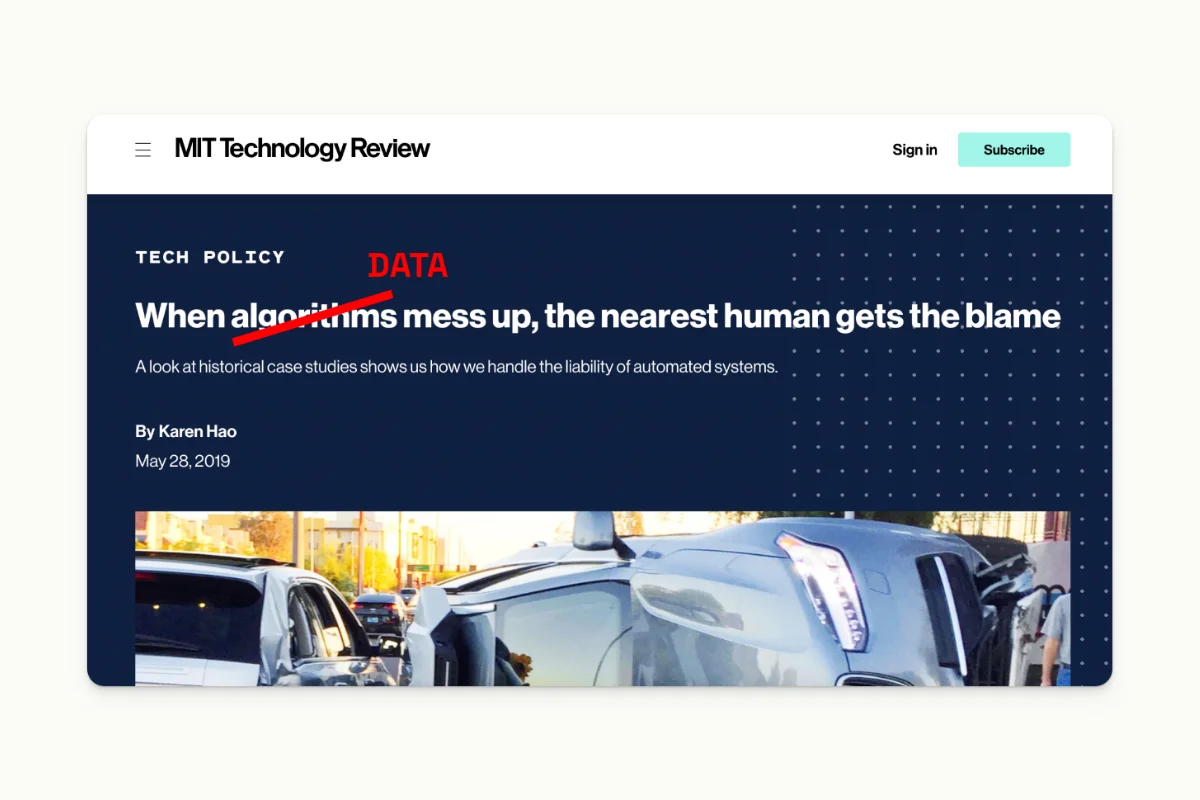
When building models, we have to keep in mind that quality should always be the number one focus. As stated by Andrew Ng and Data-Centric AI: “garbage in, garbage out”.
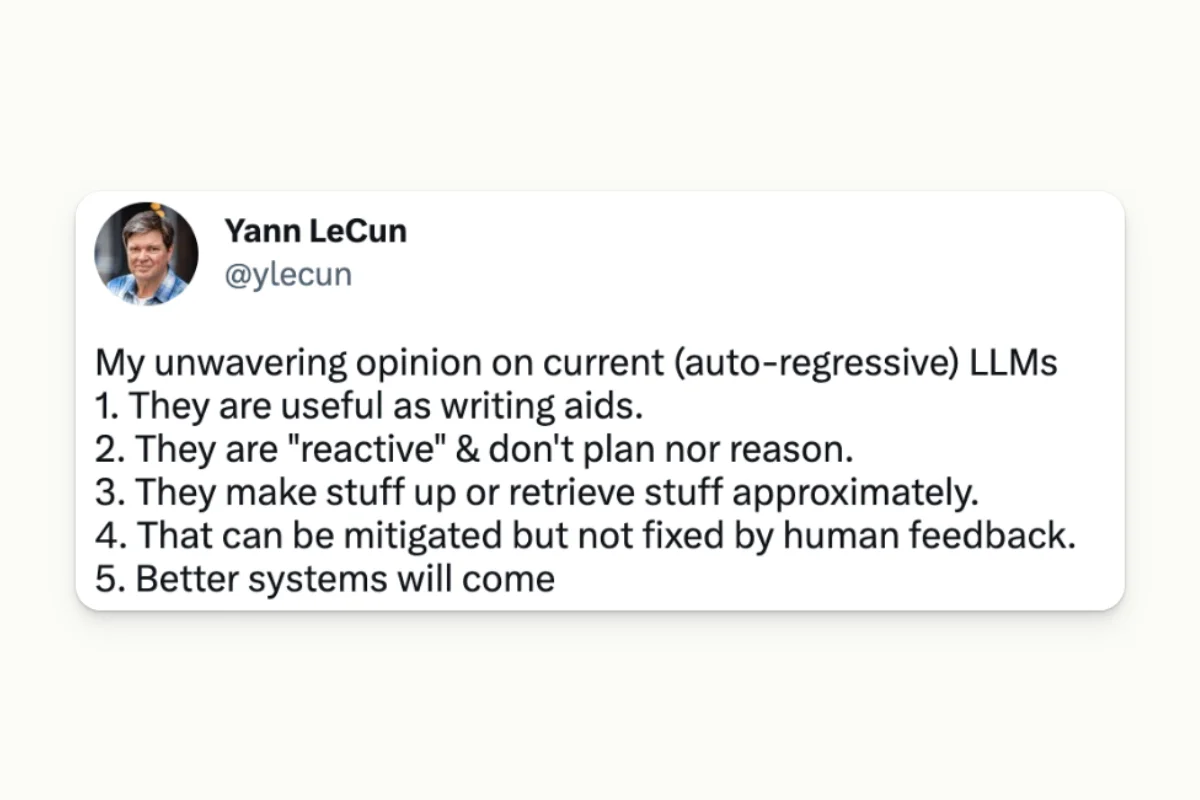
Yann LeCun has stated that Large Language Models are extremely useful, particularly as writing aids. However, the downside is that they cannot be fully controlled with human feedback.
How to Use it in Production?
If you were to compare Chat GPT with a super fine-tuned model, the latter would likely perform the best. In general, smaller models are more efficient.
Nonetheless, there are several use cases for which LLMs are particularly relevant:
- For small or few-shot NLP use cases that require human supervision.
- For supervised approaches on use cases where either accuracy, volume, or latency are important.
- For pre-annotations, which can help with review, metrics, and programmatic QA that will ensure data quality.
- To help implement QA plugins.
- To run supervised models in production for better accuracy, control, and lower costs.
Learn More
Interested in speeding up your data labeling? Make sure to check out our webinar on how to slash your data labeling time in half using ChatGPT! Access your on-demand session now.

Last Word
To conclude, ChatGPT and large language models can revolutionize the data labeling process by significantly increasing productivity and quality. However, the challenge of maintaining a high level of accuracy should not be neglected. By implementing these technologies intelligently, you can stay competitive, gain an edge against your competition, and improve your processes.
At Kili, we have developed expertise in these technologies. Feel free to reach out to us and try our free plan for yourself.
We would be super happy to have your feedback, whether it’s on the platform or on this content. Feel free to drop us a line at support@kili-technology.com.
If you're interested in boosting your data labeling productivity and automating your data labeling process, be sure to check out our other webinar on labeling automation.

.png)
_logo%201.svg)


