Introduction
This tutorial covers the following:
- Creating a custom image dataset using DuckDuckGo
- Using kili technology for image annotations
- Versioning the data using Weights & Biases
- Spinning up an AWS ec2 instance using terraform
- Training an object detection model using YoloV5
- Model versioning using DVC
Creating a custom dataset
Using jmd-imagescraper a library made by joedockrill for image scrapping DuckDuckGo makes this process easier.
- Start by installing the package using pip:
- pip install jmd-imagescraper
- Import the package and specify the path to store the images.
- from jmd_imagescraper.core import *
from pathlib import Path
root = Path().cwd() / "data" - Create a couple of search terms, these are the terms you would normally use to search for the images manually on the browser.
- In this case, we use a python dictionary with a few different terms and folders, and then later on after removing the irrelevant results we go ahead and merge all these images into a single folder.
mime = {
   'Potholes':'road potholes',
   'Dumping':'dump sites littering',
   'Accidents':'road accident',
   'Flooded':'flooded roads',
   'Bad drainage':'bad drainages roads',
   "Construction", "Road under construction, construction sites",
}
for key, value in mime.items():
   duckduckgo_search(root, key, value, max_results=120)
Here we go through all the items in the dictionary and fetch 120 images of each category.
These are then saved in the root directory which is specified above.
Once the downloads are done we need to go through the images in the folders and remove the images that we are not interested in.
4. Using image cleaner to remove the irrelevant images.
- I highly recommend running this on a jupyter notebook
from jmd_imagescraper.imagecleaner import *

display_image_cleaner(root)
Pass in the data directory to display_image_clean which creates a jupyter notebook widget.
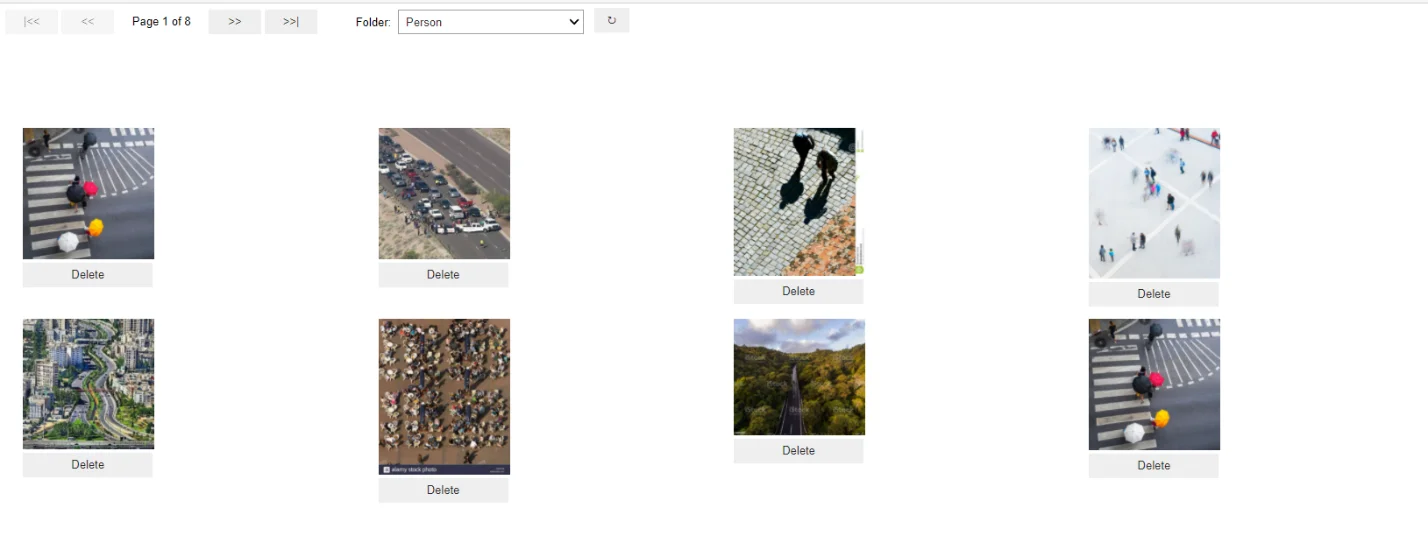
Go through the images and delete the ones that seem irrelevant.
Using Kili Technology for image annotations
Once we are satisfied with our images it’s time to annotate them.
This is mainly one of the most tasks that do take a lot of time, but this gets made a bit simpler using Kili Technology.
1. Head over to Kili and create an account. This should then direct you to a page where you can now create your project, upload, and annotate the data.
Start by clicking the add assets,
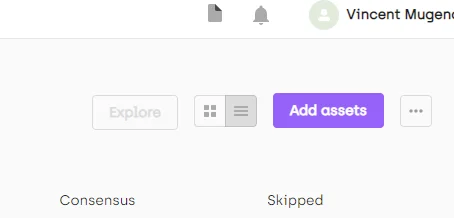
Then add the images from the download folder earlier. Do note that for uploads over the browser UI the maximum is 500 images, which are plenty for this use case but in case you need to upload more images you need a license then use the API to do that.

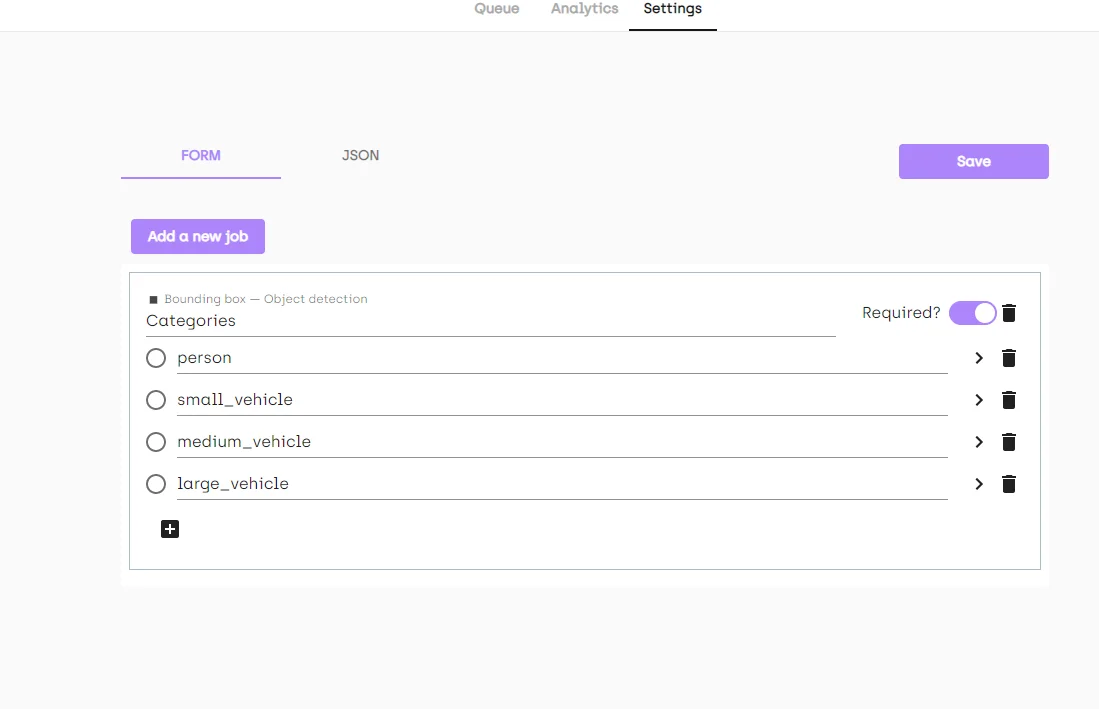
Once the upload is done it’s time to configure the project with the intended class names.
We do this by going to the settings tab on the project and adding the classes as shown below.
Substitute the categories with numbers and note down what class each label maps to. This is because the yolov4 format exported contains the names of the classes instead of the class numbers.
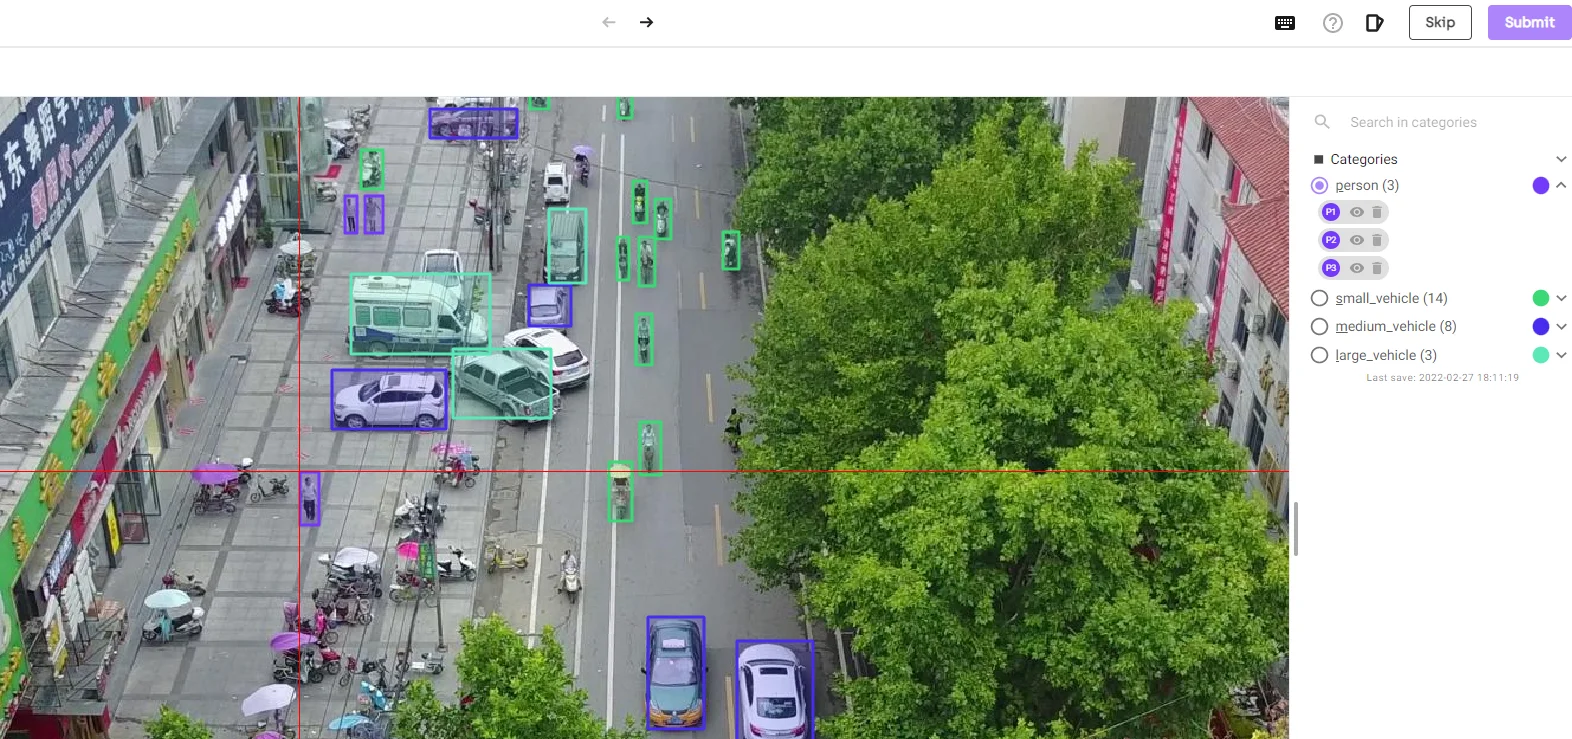
2. Save and go back to the queue. And now you can start labeling, the queue shows the images click on the first image, select a category on the right and draw bounding boxes around the objects on the image.
Once done hit submit and proceed to the next image. Repeat this until all the images are done.
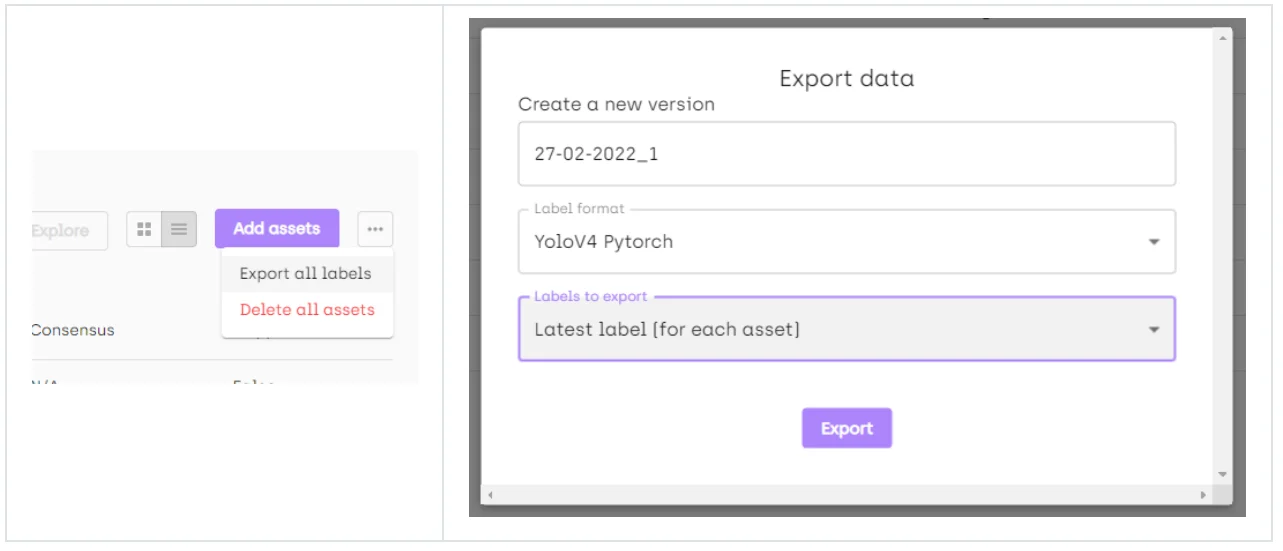
3. Final step: download the labels.
Select export labels and select YoloV4 format. This will download the annotations of the images.
Then add the images from the download folder earlier. Do note that for uploads over the browser UI the maximum is 500 images, which are plenty for this use case but in case you need to upload more images you need a license then use the API to do that.
Versioning the data using Weights & Biases
Weights & Biases is a platform that helps with model experiment tracking, data versioning & model management using artifacts.
We are going to use this to version our data, an added advantage to using Weights & Biases is we can use any machine for training without needing to manually transfer the data from our local PC to the instance.
This means we can train our model on colab and then switch to AWS for a more “beefier” instance and the data is pulled down from W&B to the VM.
The steps to accomplish this include:
1. Clone the YoloV5 repo from ultralytics and install the requirements.
# clone the repo
git clone https://github.com/ultralytics/yolov5
cd yolov5
# install the required packages
pip install -qr requirements.txt
2. Split the data into training and validation sets.
Assuming the images from the first step are in a folder named images and the downloaded annotated labels are extracted in a folder named labels, we use a simple python script to split these into a training set and a validation set.
The said script looks like this:
import os
import random
import shutil

from tqdm import tqdm

img_dir = "data/images/"
label_dir = "data/labels/"

imgList = os.listdir(img_dir)

random.seed(42)
# shuffling images
random.shuffle(imgList)

split = 0.2

train_path = "data/custom_dataset/train"
val_path = "data/custom_dataset/val"

if os.path.isdir(train_path) == False:
   os.makedirs(train_path)
if os.path.isdir(val_path) == False:
   os.makedirs(val_path)

imgLen = len(imgList)
print("Images in total: ", imgLen)

train_images = imgList[: int(imgLen - (imgLen * split))]
val_images = imgList[int(imgLen - (imgLen * split)) :]
print("Training images: ", len(train_images))
print("Validation images: ", len(val_images))

for imgName in tqdm(train_images):
   og_path = os.path.join(img_dir, imgName)
   target_path = os.path.join(train_path, imgName)

   shutil.copyfile(og_path, target_path)

   og_txt_path = os.path.join(
       label_dir,
       imgName.replace(".jpg", ".txt"),
   )
   target_txt_path = os.path.join(train_path, imgName.replace(".jpg", ".txt"))

   try:
       shutil.copyfile(og_txt_path, target_txt_path)
   except Exception:
       pass

for imgName in tqdm(val_images):
   og_path = os.path.join(img_dir, imgName)
   target_path = os.path.join(val_path, imgName)

   shutil.copyfile(og_path, target_path)

   og_txt_path = os.path.join(
       label_dir,
       imgName.replace(".jpg", ".txt"),
   )
   target_txt_path = os.path.join(val_path, imgName.replace(".jpg", ".txt"))

   try:
       shutil.copyfile(og_txt_path, target_txt_path)
   except Exception:
       pass

print("Done! ")
This splits the data and saves it in "data/custom_dataset/train" and "data/custom_dataset/val" respectively.
Before running this modify the imgList folder to the path containing the images downloaded in section 1.
Finally, run the script and you should have the images split in a training and validation folder.
3. Push data to Weights & Biases.
For this, we need to create a YAML file with the paths of the training data, validation data, the number of classes, and the names of the classes.
Here’s an example:
path: ../

train: # train images (relative to 'path')  80 images
 - data/custom_dataset/train
val: # val images (relative to 'path')  20 images
 - data/custom_dataset/val

# Classes
nc: 4 # number of classes
names: ["Person", "Small vehicle", "Medium vehicle", "Large vehicle"]
With this done to push the data, we use log dataset from YoloV5 by providing the dataset YAML file as a command-line argument.
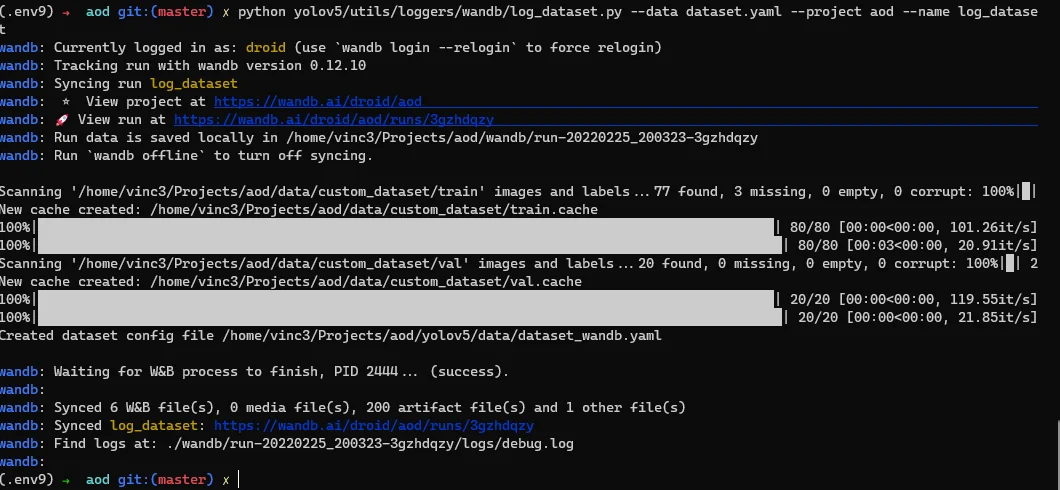
python yolov5/utils/loggers/wandb/log_dataset.py --data dataset.YAML --project aod --name log_datasetOnce the push is done you will notice a new file created in the current directory with _wand appended to it. This is the file to pass to YoloV5 as the data path.
YoloV5 will take care of pulling the data and training and logging the metrics.
Learn more!
Discover how training data can make or break your AI projects, and how to implement the Data Centric AI philosophy in your ML projects.
Spinning up an AWS ec2 instance using terraform
Terraform makes setting up and managing cloud infrastructure easier. To set up or destroy cloud resources only requires a single command.
Follow the terraform getting started guide to install and configure terraform.
1. Define resources as code.
We define the resources in main.tf file.
provider "aws" {
profile = "default"
region  = "us-east-2"
}
resource "aws_security_group" "instance_security_group" {
name        = "instance-security-group"
description = "Allow SSH traffic"
ingress {
description     = "SSH"
from_port       = 22
to_port         = 22
protocol        = "tcp"
cidr_blocks     = ["0.0.0.0/0"]
}
egress {
from_port   = 0
to_port     = 0
protocol    = "-1"
cidr_blocks = ["0.0.0.0/0"]
}

tags = {
Name = "terraform-instance-security-group"
}
}
variable "PUBLIC_KEY" {
default = "~/.ssh/key.pub"
}

variable "PRIVATE_KEY" {
default = "~/.ssh/key"
}

variable "USER" {
default = "ubuntu"
}

resource "aws_key_pair" "aod" {
key_name   = "aod"
public_key = file(var.PUBLIC_KEY)
}

resource "aws_instance" "aod" {
key_name      = aws_key_pair.aod.key_name
ami           = "ami-075815a4ba524a0ab"
instance_type = "g4dn.xlarge"

tags = {
Name = "aod"
}

vpc_security_group_ids = [
aws_security_group.instance_security_group.id
]

connection {
type        = "ssh"
user        = "aod"
private_key = file("key")
host        = self.public_ip
}

ebs_block_device {
device_name = "/dev/sda1"
volume_type = "gp2"
volume_size = 500
}
}

resource "aws_eip" "aod" {
vpc      = true
instance = aws_instance.aod.id
}

output "eip" {
value = aws_eip.aod.public_ip
}
Here we define the instance type g4dn.xlarge this instance has a tesla t4 GPU and we also assign an elastic IP to the instance.
2. Resource provisioning.
# initialize terraformterraform init# apply terraform applyThis initializes terraform in the current directory, and setups the resources on AWS.
Once done an IP gets printed to the screen. This is the IP to use to ssh to the instance.
Training an object detection model using YoloV5
YoloV5 makes training object detection models so much easier compared to previous versions and other object detection techniques.
It’s also fully integrated with Weights & Biases, this means fetching data, logging metrics including a bounding debugger as the model trains, and also pushing the models as a W&B artifact.
How to train this object detection model using YoloV5:
1. Setup YoloV5 on the instance
SSH to the running instance, clone the YoloV5 repo using the same procedure as in the data logging section, and install the requirements.
# clone the repo
git clone https://github.com/ultralytics/yolov5.git
cd yolov5
# install the requirements
pip install -qr requirements.txt
2. Start training
Once the requirements are set up we simply start training, passing the dataset_wandb.yaml file created when pushing the dataset artifact to W&B.
python train.py --img 640 --batch 16 --epochs 30 --data ../dataset_wandb.yaml --weights yolov5m.pt --cache --bbox_interval 1 --project <project name>Here we use an image size of 640 a batch size of 16 feel free to change this depending on the instance you are running, we train for 30 epochs and pass the dataset_wandb.yaml use yolov5m weights (for a list of all the pre-trained models check out the YoloV5 repo), the project creates a project on W&B with the name specified.
3. Monitor the training progress on W&B
Open the link printed on the console and this should direct you to the W&B project dashboard.
Run summary automatically added. (Shown below)

Validation metrics and media. (Shown below)
.webp)
Model versioning using DVC (data version control)
Once training is done we can use DVC to version our models same using the same techniques as GIT
Setup DVC and push the models to S3
1. Install DVC
pip install "dvc[s3]"2. Initialize DVC
# set the AWS credentials
export AWS_ACCESS_KEY_ID=<your id>
export AWS_SECRET_ACCESS_KEY=<your key>
# initialize DVC
dvc init
This initializes DVC in the current directory.
3. Add remote and push the model
Next, we add a remote bucket create one on S3, add the model and push the model to the bucket.
dvc remote add -d storage s3://<bucket name>/trained_models
dvc add <path to model> --file dvcfiles/model.dvc
This creates model.dvc file which we add to git, this file is used by DVC to fetch models or update a new model.
Push the model to the bucket.
dvc push dvcfiles/model.dvcThen stage the model.dvc file and push it to Github or Gitlab or any version control system of your preference.
# stage the model.dvc file
git add dvcfiles/model.dvc
# commit the file
git commit -m "model file"
# push to VCs
git push
Conclusion
This tutorial covered some of the main parts that go into creating a dataset and training a model with very decent performance and can be adapted to fit any use case, just switch out the data and create your own custom dataset using the steps outlined above.
This shows how with the help of data labeling tools like kili-technology, coupled with domain expertise one can integrate deep learning to work on problems related to their day-to-day work and use case.
Stay tuned for the next tutorial on how to deploy the model we just trained using Django and Django rest framework.
Find the complete source code for reference on this Github link https://github.com/mrdvince/aod.

.png)
_logo%201.svg)


